本文最后更新于 2024年11月25日 凌晨
关于如何使用VS Code简单配置C/C++环境,以及一点点MSYS2与CMake的配合用法
前言
VS Code是一个开源轻量级的代码编辑器,支持多种编程语言,但是由于VS Code本身并不附带对于各种语言的支持,所以比较高的配置门槛难倒了不少新手大学生。本文将介绍如何使用VS Code简单配置C/C++环境。
提醒
本教程需要有较好的网络环境,并且有基础的安装软件能力
正文
安装Visual Studio Code
首先需要下载Visual Studio Code,下载官网请点击这里
然后运行安装程序,按照提示安装,安装与基本配置可以参考这里
进入VSCode后参考上面教程安装简体中文扩展包,以及C/C++扩展包,推荐安装:
- C/C++
- C/C++ Themes
- C/C++ Intellisense
- C/C++ Extension Pack
- C/C++ Compile Run
安装C/C++编译器
由于VS Code本身并不包含C/C++编译器,所以需要自己去网上下载
考虑到各种问题,笔者推荐使用MSYS2配置C/C++环境。
首先前往MSYS2官网下载MSYS2,官网点这里
官网默认英语,在首页就有下载入口,点击下载即可,看不懂英语请自行配合翻译软件使用
然后运行下载好的MSYS2安装程序,按照提示安装即可,安装时间较长,请耐心等待,安装十分钟是很正常的事情
安装完成后,打开MSYS2

输入pacman -Syu,等待更新完成。

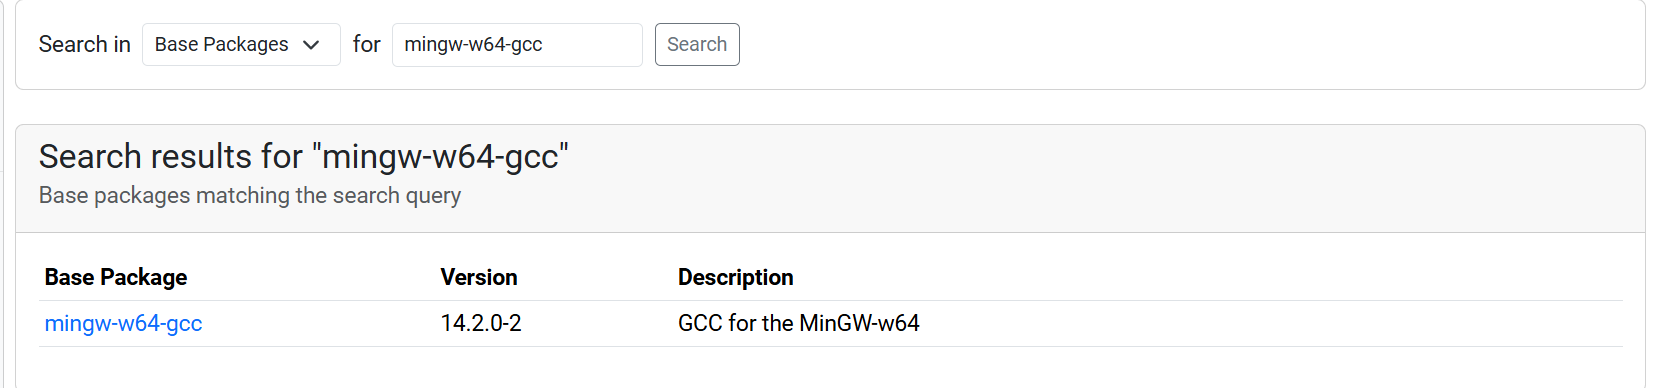
回到官网,点击左边栏的Package Index,然后在搜索框输入mingw-w64-gcc

点进页面中,往下翻到Binary Packages,按照自己的需求选择版本,没有特殊需求可以选择mingw64里面的mingw-w64-x86_64-gcc即可。
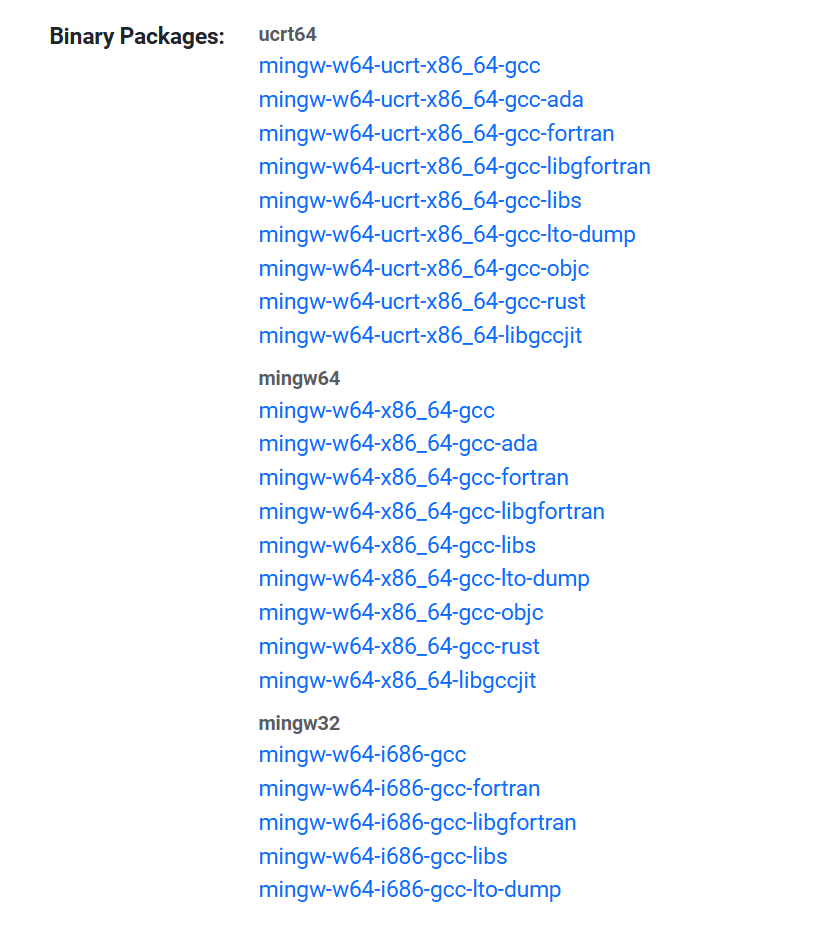
下面以mingw-w64-x86_64-gcc为例,点进页面找到Installation,将代码复制到MSYS2的终端中,然后回车,按照提示输入y即可,等待安装完成。

配置VS Code
在工作文件夹下新建名为.vscode的文件夹,然后在其中新建四个文件:
c_cpp_properties.jsonlaunch.jsontasks.jsonsettings.json
随后将以下代码复制到对应文件中,此处代码以默认安装路径为例,实际操作时请将其中所有含路径的内容修改为自己电脑上的安装位置
c_cpp_properties.json
1
2
3
4
5
6
7
8
9
10
11
12
13
14
15
16
17
18
19
| {
"configurations": [
{
"name": "Win32",
"includePath": [
"${workspaceFolder}/**"
],
"defines": [
"_DEBUG",
"UNICODE",
"_UNICODE"
],
"cStandard": "gnu17",
"cppStandard": "c++20",
"intelliSenseMode": "gcc-x64"
}
],
"version": 4
}
|
launch.json
1
2
3
4
5
6
7
8
9
10
11
12
13
14
15
16
17
18
19
20
21
22
23
24
25
26
27
28
29
| {
"version": "0.2.0",
"configurations": [
{
"name": "(gdb) Launch",
"preLaunchTask": "C/C++: g++.exe 生成活动文件",
"type": "cppdbg",
"request": "launch",
"program": "${fileDirname}\\${fileBasenameNoExtension}.exe",
"args": [],
"stopAtEntry": false,
"cwd": "${workspaceFolder}",
"environment": [],
"externalConsole": false,
"MIMode": "gdb",
"miDebuggerPath": "C:\\msys64\\mingw64\\bin\\gdb.exe",
"setupCommands": [
{
"description": "Enable pretty-printing for gdb",
"text": "-enable-pretty-printing",
"ignoreFailures": true
}
]
}
]
}
|
tasks.json
1
2
3
4
5
6
7
8
9
10
11
12
13
14
15
16
17
18
19
20
21
22
23
24
25
26
27
28
| {
"version": "2.0.0",
"tasks": [
{
"type": "cppbuild",
"label": "C/C++: g++.exe 生成活动文件",
"command": "C:/msys64/mingw64/bin/g++.exe",
"args": [
"-fdiagnostics-color=always",
"-g",
"${file}",
"-o",
"${fileDirname}\\${fileBasenameNoExtension}.exe"
],
"options": {
"cwd": "C:/msys64/mingw64/bin"
},
"problemMatcher": [
"$gcc"
],
"group": {
"kind": "build",
"isDefault": true
},
"detail": "编译器: C:/msys64/mingw64/bin/g++.exe"
},
]
}
|
settings.json
1
2
3
4
5
6
7
8
9
10
11
12
13
14
15
16
17
18
19
20
21
22
23
24
25
26
27
28
29
30
31
32
33
| {
"files.associations": {
"*.cpp": "cpp",
"array": "cpp",
"*.tcc": "cpp",
"deque": "cpp",
"string": "cpp",
"unordered_map": "cpp",
"vector": "cpp",
"memory": "cpp",
"optional": "cpp",
"string_view": "cpp",
"fstream": "cpp",
"istream": "cpp",
"ostream": "cpp",
"sstream": "cpp",
"streambuf": "cpp",
"tuple": "cpp",
"type_traits": "cpp",
"algorithm": "cpp",
"iostream": "cpp",
"ratio": "c",
"valarray": "c",
"iosfwd": "cpp",
"random": "cpp",
"cmath": "cpp",
"numbers": "cpp",
"cstdlib": "cpp",
"cstdint": "cpp"
},
"C_Cpp.errorSquiggles": "enabledIfIncludesResolve",
"C_Cpp.default.compilerPath": "C:\\msys64\\mingw64\\bin\\g++.exe",
}
|
然后在工作目录下新建C/C++文件,自行写入一段代码测试即可。
关于CMake的扩展
请参考以下文章,教程传送门
结语
本文简单介绍了一些关于VS Code配置C/C++环境的方法,以及一篇笔者认为写的不错的MSYS2进阶教程,欢迎各位学习
如果有不理解或感到疑惑的地方请在评论区指出,感谢各位阅读。